이제 마지막이다.. 어느새 또 새벽이다...

1. 먼저 궤적에 맞춰 날아가야 하므로 궤적 구현 부분에 쓰였던 값들을 가져오자
 public void Throw(Transform _firePos)
 {
     Vector3 _velocity = _firePos.forward * throwForce;
     Vector3 _localStartPos = new Vector3(0, 0.5f, 1f);      // 카메라 기준으로 궤적 시작 위치 설정
     Vector3 _position = _firePos.TransformPoint(_localStartPos);

 }
그 다음은 매우 간단하다 ( 매우 어려운 작업은 궤적에서 다 했기 때문이다 )
2. 위치를 대입해주고 리지드바디를 가져와 속도를 대입해준다
public void Throw(Transform _firePos)
{
    Vector3 _velocity = _firePos.forward * throwForce;
    Vector3 _localStartPos = new Vector3(0, 0.5f, 1f);      // 카메라 기준으로 궤적 시작 위치 설정
    Vector3 _position = _firePos.TransformPoint(_localStartPos);

    Rigidbody rb = GetComponent<Rigidbody>();
    this.transform.position = _position;

    rb.velocity = _velocity;
    trajectoryLine.enabled = false;
    Explosion();
}
trajectoryLine.enabled = false; 이 부분을 써주지 않는다면 던진 후에도 궤적 표시가 계속 될테니 꺼주자.
* Explosion(); 부분은 맨 처음 폭발하는 메서드
하지만 눈에 거슬리는게 있다.
바로 초기값 부분을 세팅해줬던 부분이 궤적표시와 던지기에서 똑.같.이. 쓰인다는 것이다
3. 그래서 이부분을 함수로 빼서 호출해주자
 private (Vector3 velocity, Vector3 position) CalculateTrajectoryVector(Transform _firePos)
 {
     Vector3 _velocity = _firePos.forward * throwForce;
     Vector3 _localStartPos = new Vector3(0, 0.5f, 1f);      // 카메라 기준으로 궤적 시작 위치 설정
     Vector3 _position = _firePos.TransformPoint(_localStartPos);

     return (_velocity,_position);
 }
vector3 값을 돌려 받아야 하니 vector3 함수로 만들어 리턴값을 받았다
이번에 찾아보며 안것이지만, 두가지 이상의 값을 리턴 받아야 할때는 위의 형태로 돌려 받을 수 있다
쓰는곳도 수정해줘야하는데 'var'로 값을 받는다
 public void Throw(Transform _firePos)
 {
     var (_velocity, _position) = CalculateTrajectoryVector(_firePos);
     Rigidbody rb = GetComponent<Rigidbody>();
     this.transform.position = _position;

     rb.velocity = _velocity;
     trajectoryLine.enabled = false;
     Explosion();
 }
var 키워드는 암시적 타입 지역 변수를 선언할때 사용된다
컴파일러가 변수의 타입을 자동으로 추론한다
사용 시기:
1. 복잡한 타입명을 간소화할 때
var dictionary = new Dictionary<string, List<Customer>>();
// 위 코드는 아래와 동일
Dictionary<string, List<Customer>> dictionary = new Dictionary<string, List<Customer>>();
2. LINQ 쿼리 결과를 저장할 때:
var results = from c in customers where c.City == "Seattle" select c;3. 익명 타입을 사용할 때:
var anonymousType = new { Name = "John", Age = 30 };
장점:
- 코드를 더 간결하게 만들 수 있다.
- 긴 타입명을 반복해서 작성할 필요가 없어다.
- 타입이 명확한 경우 가독성을 향상시킬 수 있다.
단점:
- 과도한 사용 시 코드의 명확성이 떨어질 수 있다.
- 타입을 명시적으로 볼 수 없어 코드 이해에 어려움을 줄 수 있다.
주의사항:
- var는 지역 변수에만 사용할 수 있습니다. (필드, 프로퍼티, 파라미터 등에는 사용 불가능)
- var를 사용할 때는 반드시 초기화를 해야 한다.
- null로 초기화할 때는 var를 사용할 수 없다.
이제 인풋클래스에서 클릭했을 때 동작만 만들면 된다
public class GunShootTest : MonoBehaviour
{
    public Transform firePos;
    private ThrowingWeapon myThrow;

    void Update()
    {
        myThrow = GetComponentInChildren<ThrowingWeapon>();

        if (Input.GetMouseButton(0) && myThrow != null)
        {
            myThrow.UpdateTrajectory(firePos);
        }

        if (Input.GetMouseButtonUp(0) && myThrow != null)
        {
            myThrow.Throw(firePos);
        }
    }
}
간단하게 ThrowingWeapon 스크립트를 찾아주고
각 버튼에 맞게 함수를 불러와줬다
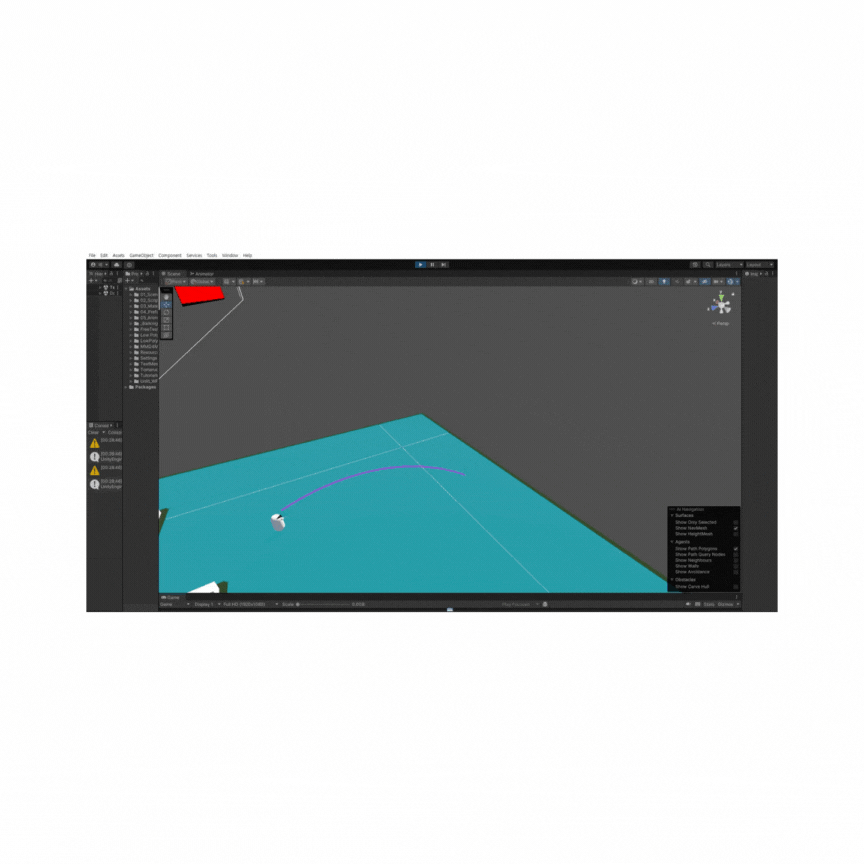
수류탄 던지는 영상
전체 코드
public class GunShootTest : MonoBehaviour
{
    public Transform firePos;
    private ThrowingWeapon myThrow;

    void Update()
    {
        myThrow = GetComponentInChildren<ThrowingWeapon>();

        if (Input.GetMouseButton(0) && myThrow != null)
        {
            myThrow.UpdateTrajectory(firePos);
        }

        if (Input.GetMouseButtonUp(0) && myThrow != null)
        {
            myThrow.Throw(firePos);
        }
    }
}
public abstract class ThrowingWeapon : MonoBehaviour
{
public float explosiondelay = 3f; // 폭발 시간
public float explosionRadius = 5f; // 폭발 반경
public float throwForce = 10f; // 던지는 힘
public LineRenderer trajectoryLine; // 궤적 라인
int trajectoryLinePoint = 40; // 궤적 포인트 갯수
protected virtual void Awake()
{
trajectoryLine = GetComponent<LineRenderer>();
trajectoryLine.enabled = false;
}
// 라인 렌더러 설정
void SetupTrajectoryLine()
{
trajectoryLine.startWidth = 0.1f;
trajectoryLine.endWidth = 0.1f;
trajectoryLine.startColor = Color.red;
trajectoryLine.endColor = Color.red;
}
// 궤적 시작위치
private (Vector3 velocity, Vector3 position) CalculateTrajectoryVector(Transform _firePos)
{
Vector3 _velocity = _firePos.forward * throwForce;
Vector3 _localStartPos = new Vector3(0, 0.5f, 1f); // 카메라 기준으로 궤적 시작 위치 설정
Vector3 _position = _firePos.TransformPoint(_localStartPos);
return (_velocity,_position);
}
// 궤적 업데이트
public void UpdateTrajectory(Transform _firePos)
{
SetupTrajectoryLine();
trajectoryLine.positionCount = trajectoryLinePoint; // 라인렌더러 점 카운트
var(_velocity, _position) = CalculateTrajectoryVector(_firePos);
float _timeStpe = 1f/15f; // 등가속도 운동 값
// 속도와 중력에 의해 변화를 계산해서 점 찍기
for (int i = 0; i < trajectoryLinePoint; i++)
{
trajectoryLine.SetPosition(i, _position);
_velocity += Physics.gravity * _timeStpe;
_position += _velocity * _timeStpe;
}
trajectoryLine.enabled = true; // 궤적 활성화
}
// 던지기
public void Throw(Transform _firePos)
{
var (_velocity, _position) = CalculateTrajectoryVector(_firePos);
Rigidbody rb = GetComponent<Rigidbody>();
this.transform.position = _position;
rb.velocity = _velocity;
trajectoryLine.enabled = false;
Explosion();
}
// 폭발
public void Explosion()
{
StartCoroutine(Explode());
}
protected abstract IEnumerator Explode();
}public class Grenade : ThrowingWeapon
{
public int damage = 100; // 데미지
public LayerMask attackableMask;
protected override IEnumerator Explode()
{
yield return new WaitForSeconds(explosiondelay);
Collider[] _colliders = Physics.OverlapSphere(transform.position, explosionRadius, attackableMask);
foreach(Collider _collider in _colliders)
{
float _distance = Vector3.Distance(transform.position, _collider.transform.position);
float _damagePersent = 1 - (_distance/explosionRadius);
int _calDamage = Mathf.RoundToInt(damage * _damagePersent);
_collider.GetComponent<IDamageAble>().Damaged(_calDamage);
}
}
}
연막탄이나 섬광탄을 만들고 싶다면
public class 연막탄,섬광탄 등 : ThrowingWeapon
{
    public LayerMask attackableMask;

    protected override IEnumerator Explode()
    {
        yield return new WaitForSeconds(explosiondelay);
    }
}
이 툴 안에다가 각기 다른 효과만 넣어주면 되므로 금방 만들 수 있을 것이다
++ 24.10.27 추가
조금 어색했던 부분을 보완하였다.
// 궤적 업데이트
public void UpdateTrajectory(Transform _firePos)
{
    SetupTrajectoryLine();
    trajectoryLine.positionCount = trajectoryLinePoint;  // 라인렌더러 점 카운트

    var(_velocity, _position) = CalculateTrajectoryVector(_firePos);

    _velocity.y *= 1.2f;	// Y값만 추가

    float _timeStep = 1f/30f; // 등가속도 운동 값
    int _actualPoints = 0;

    // 속도와 중력에 의해 변화를 계산해서 점 찍기
    for (int i = 0; i < trajectoryLinePoint; i++)
    {
        trajectoryLine.SetPosition(i, _position);
        _actualPoints++;

        if (Physics.Raycast(_position, _velocity.normalized, out RaycastHit hit, _velocity.magnitude * _timeStep))
        {
            // 충돌 지점을 마지막 점으로 설정
            trajectoryLine.SetPosition(i + 1, hit.point);
            _actualPoints++;
            break; // 루프 종료
        }

        _velocity += Physics.gravity * _timeStep;
        _position += _velocity * _timeStep;
    }
    trajectoryLine.positionCount = _actualPoints;
    trajectoryLine.enabled = true;  // 궤적 활성화
}
보완한 부분
1. _velocity의 y값만 1.2씩 곱해준다.
라인렌더러의 변화값을 보다가 y값만 더 다이나믹 해지면 내가 더 원하는 느낌이 나올 것 같았다.
기존의 구현한 것보다 훨씬 자연스러워졌으니 한번 값을 곱해보시면 좋을 듯 싶다.
2. 레이캐스트로 충돌 지점을 구해 그 지점에서 루프가 종료되도록 한다.
또한 기존에는 같은 갯수의 점이 찍혀 라인렌더러가 벽을 통과해서 그려지거나 하는 문제가 있었다.
이부분도 레이캐스트로 막아버렸다. 그 결과 점이 찍히는 갯수가 변하며 지정한 지점까지만 정확히 찍히게 되었다.


'유니티 > 기능구현' 카테고리의 다른 글
| [Unity] 유니티 C#) FPS 주무기를 어떻게 구현할까? ( 샷건 ) (0) | 2024.10.23 |
|---|---|
| [Unity] 유니티 C#) FPS 주무기를 어떻게 구현할까? ( 돌격소총 ) (0) | 2024.10.17 |
| [Unity] 유니티 C#) FPS 주무기를 어떻게 구현할까? ( 주무기 클래스 ) (10) | 2024.10.17 |
| [Unity] 유니티 C#) 투척무기 구현을 어떻게 할까? ( 궤적 표시 ) (0) | 2024.08.10 |
| [Unity] 유니티 C#) 투척무기 구현을 어떻게 할까? ( 폭발 ) (0) | 2024.08.09 |